
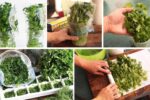
Kale is a nutrient-packed, hardy leafy green that has become a favorite in home gardens worldwide. Known for its rich flavor, versatility in cooking, and high levels of vitamins and antioxidants, kale is also remarkably easy to grow. One of the secrets to maximizing your kale harvest is learning how to harvest it correctly for continuous growth. With the right techniques, you can enjoy fresh, tender leaves throughout the growing season without harming the plant.
In this guide, we’ll explore everything you need to know about harvesting kale for continuous growth, including the best harvesting methods, timing, care after harvesting, and tips to keep your plants productive and healthy.
Why Harvesting Technique Matters

Proper harvesting is not just about picking leaves; it’s about maintaining plant health and encouraging regrowth. Incorrect harvesting can stress the plant, slow new leaf production, and reduce your overall yield.
Benefits of proper kale harvesting:
- Continuous Supply: Keeps plants producing fresh leaves for weeks or months.
- Healthier Plants: Minimizes stress and susceptibility to pests and diseases.
- Flavor Maintenance: Young, tender leaves taste sweeter and more mild.
- Aesthetic Garden: Regular harvesting prevents overgrown, leggy plants.
Step 1: Knowing When to Harvest

Kale can be harvested at various stages, depending on your culinary preferences and gardening goals:
Young Kale Leaves (Baby Kale)
- Harvest 3–5 weeks after planting.
- Leaves are small, tender, and ideal for salads, smoothies, and garnishes.
Mature Leaves
- Usually 6–8 inches long and deep green.
- Best for cooking, soups, sautés, and kale chips.
Tips for Timing
- Begin harvesting when the plant has enough mature leaves to allow regrowth—typically at least 6–8 leaves per plant.
- Avoid harvesting too early, as young plants need leaves for energy and root development.
- Morning harvest is ideal; leaves are crisp and hydrated after overnight moisture.
Step 2: Choosing the Right Leaves

Not all leaves should be harvested at once. To encourage continuous growth:
- Outer Leaves: Pick the outermost, mature leaves first. These are older leaves, leaving the inner, smaller leaves to continue growing.
- Avoid the Center: The central growth tip is the plant’s energy hub. Damaging it can slow or stop new leaf production.
- Healthy Leaves Only: Avoid yellowing, damaged, or pest-affected leaves to maintain overall plant health.
Step 3: Harvesting Techniques

Kale is versatile, but how you cut or remove leaves can affect future growth.
1. The Snip-and-Pick Method
- Use sharp scissors or pruning shears to cut leaves about 1–2 inches from the base.
- Cut cleanly to prevent tearing, which can invite disease.
- Rotate which leaves you harvest to avoid stressing the plant.
2. The Snap Method
- For small home gardens, you can gently twist and snap leaves off at the base.
- Works best for tender leaves but may leave small nicks if done roughly.
Tips for Continuous Harvest
- Harvest leaves gradually rather than removing many at once.
- Never remove more than one-third of the plant at a time. This ensures sufficient foliage remains for photosynthesis.
- Regular harvesting encourages the plant to produce more leaves continuously.
Step 4: Maintaining Plant Health After Harvest

After harvesting, proper care ensures kale continues to thrive:
Watering
- Keep soil consistently moist but well-drained. Kale prefers even moisture, especially after leaf removal.
- Mulching around the base helps retain soil moisture and regulate temperature.
Fertilization
- Kale benefits from additional nutrients after repeated harvests.
- Apply a balanced fertilizer or side-dress with compost to encourage strong regrowth.
- Nitrogen-rich fertilizer promotes leafy growth, ideal for kale.
Pest Control
- Regular harvesting can attract pests like aphids, cabbage worms, or flea beetles.
- Remove affected leaves promptly, use organic insecticidal soap, or introduce beneficial insects.
- Maintain good airflow by thinning plants to reduce disease risk.
Step 5: Timing Your Harvest for Flavor
The sweetness and tenderness of kale are influenced by harvest timing:
- Cooler Weather: Leaves harvested after a light frost taste sweeter, as cold converts starches to sugars.
- Avoid Heat Stress: During hot summer months, harvest early in the morning to prevent wilting and bitterness.
- Consistent Harvesting: Regular leaf removal prevents older leaves from becoming tough and bitter.
Step 6: Extending the Harvest Season
With the right practices, kale can produce for months:
Succession Planting
- Stagger plantings every 2–3 weeks for a continuous supply of leaves throughout the growing season.
Container Gardening
- Plant kale in pots or raised beds to control soil quality and spacing.
- Containers can be moved to cooler or sunnier spots as needed.
Cold Protection
- Kale is hardy, but in colder regions, row covers or frost blankets can extend the growing season into late fall or winter.
Regrowing Cuttings
- Some gardeners propagate kale from cuttings: place a stem in water until roots develop, then transplant for another plant.
Step 7: Harvesting Tips for Maximum Yield
- Rotate Leaves: Harvest leaves from different sides each time to prevent uneven growth.
- Don’t Strip the Plant: Always leave enough foliage for photosynthesis.
- Watch Growth Patterns: Some kale varieties grow more vigorously than others; adjust harvest frequency accordingly.
- Regular Observation: Inspect plants for signs of stress, pests, or nutrient deficiencies.
Step 8: Post-Harvest Handling
- Wash harvested leaves in cold water to remove dirt and insects.
- Dry gently before storing in the refrigerator to extend shelf life.
- Store in perforated plastic bags or containers to maintain moisture without wilting.
- Kale can be frozen if harvested in abundance: blanch leaves briefly, then freeze for later use.
Step 9: Common Challenges and Solutions
Even with careful harvesting, kale plants may face challenges:
Pest Issues
- Aphids: Spray with mild soapy water or use neem oil.
- Cabbage Worms: Handpick or use row covers to protect leaves.
- Flea Beetles: Mulch and monitor young plants.
Disease Concerns
- Downy Mildew or Leaf Spot: Remove affected leaves and maintain proper spacing.
- Bolting: High temperatures and stress may cause flowering; harvest leaves early and provide shade or regular watering.
Nutrient Deficiencies
- Yellowing leaves may indicate nitrogen deficiency—apply a nitrogen-rich fertilizer.
- Calcium or magnesium deficiencies can affect leaf texture; amend soil as needed.
Bonus Tips for Continuous Kale Growth
- Regular Observation: Frequent monitoring ensures optimal harvest and pest management.
- Companion Planting: Plant kale alongside herbs like dill or parsley to repel pests naturally.
- Mulching: Keeps roots cool, conserves water, and improves soil health.
- Rotate Crops: Avoid planting kale in the same soil repeatedly to prevent disease buildup.
- Harvest Gradually: Continuous, selective harvesting is the key to a prolonged season.
Final Thoughts
Kale is one of the most rewarding vegetables to grow, not only for its nutritional value but also for its ability to produce continuously when harvested correctly. By understanding the right timing, selecting mature outer leaves, using proper cutting techniques, and caring for the plant after each harvest, you can enjoy fresh, tender kale throughout the growing season.
Whether you’re growing kale in a backyard garden, raised bed, or container, these techniques ensure your plants remain healthy, productive, and full of flavor. The key is gradual, thoughtful harvesting combined with consistent care—providing you with an abundant supply of green, nutrient-rich leaves for weeks or even months.
With these methods, your kale plants will reward you with a continuous harvest of delicious, tender leaves, perfect for salads, sautés, smoothies, and more—making your garden a reliable source of fresh, healthy greens all season long.

Leave A Comment